Relay-Key Online Guide
What to do when this happens?
- The confirmation LED is lighted red.
- There is no reaction when inserted in the USB port.
- The confirmation LED does not extinguish after disconnection from the USB port.
- When replacing or reinserting the batteries
- When this message is displayed
- Initializing the Relay-Key
- Closing the special application
The confirmation LED is lighted red
If you press the communication button and the confirmation LED lights red except when implementing the initial registration of the Relay-Key, that means that there is an error in the Relay-Key internal processing.
If this happens, the error can be resolved by connecting the Relay-Key to the PC.
There is no reaction when inserted in the USB port
Is the Relay-Key firmly and completely inserted into the PC's USB port?
Is the connection loose?
If so, use the accessory USB extension cable.
[If the problem is not resolved]
Is the special application activated?
* Shortcut execution

* Confirmation that the application is resident in memory
If it is activated and there is no particular response, confirm the conditions of Relay-Key registration in the PC.
Confirming the conditions of registration in the PC
[» Display Procedure for confirming the conditions of registration in the PC]
Execute the following tasks as indicated in the procedural manual:
(1) Confirmation of registration conditions
(2) Correction
(3) Final confirmation
Please send an inquiry if it is not possible to avoid problems that differ from this example after referring to the online guide.
The confirmation LED does not extinguish after disconnection from the USB port
If this happens, try reinserting the batteries. After that, the confirmation LED should light red when the communication button is pressed.
After confirming this, insert the Relay-Key into the PC and resolve the error.
When replacing or reinserting the batteries
The batteries must be replaced or reinserted at times due to low level charge, drops, etc.
At such times, the internal Relay-Key clock is reset and the confirmation LED will therefore light red even if the communication button is pressed.
Insert the Relay-Key to the PC and resolve the error.
When this message is displayed
If you connect the Relay-Key to the PC and this message is displayed, please contact the inquiry desk indicated.
We will repair the device or replace parts as required.

Initializing the Relay-Key
When the Relay-Key is initialized, it reverts to the same conditions as when first purchased. Execute initialization according to the initialization procedure.
Note: Transfer to third parties
The Relay-Key is for individual use. Initialization will be required if you give your own Relay-Key to a family member or friend. Anyone can do this as long as they have the Tanita ID and password acquired on the website.
[Initialization procedure]
1. Connect the Relay-Key to your PC.
The member's page logon screen will be activated; however, you should close that page.
2. Execute initialization
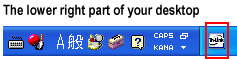
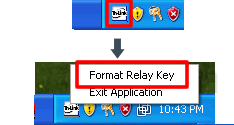
Right-click the resident application in the lower right corner of the Desktop. The initialization dialog box appears when [Initialize Relay-Key] is selected.
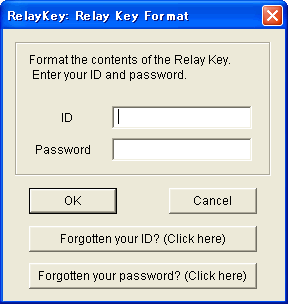
3. Entering ID and password
Enter the Health Diary ID and password that you have acquired.
Press [OK] after entering.
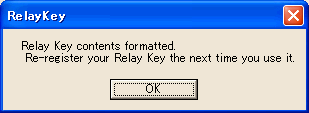
4. Completion of initialization
The initialization completion dialog box appears. Press [OK] and close.
Closing the special application
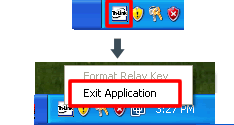
1. Closing the application
Right-click the resident application in the lower right corner of the Desktop.
Select [Close application].
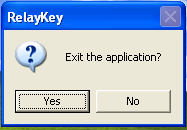
2. Conclusion
The conclusion confirmation dialog box appears.
The application closes when [Yes] is selected and it is no long resident in memory.